How To Add HubSpot DMARC, SPF, and DKIM Records Correctly?

Quick Answer
To add HubSpot DMARC, SPF, and DKIM records, connect your sending domain in HubSpot, add the required DNS records at your DNS provider, then verify them in HubSpot. Proper authentication improves email deliverability, protects against spoofing, and helps emails reach inboxes.
Try Our Free DMARC Checker
Validate your DMARC policy, check alignment settings, and verify reporting configuration.
Check DMARC Record →
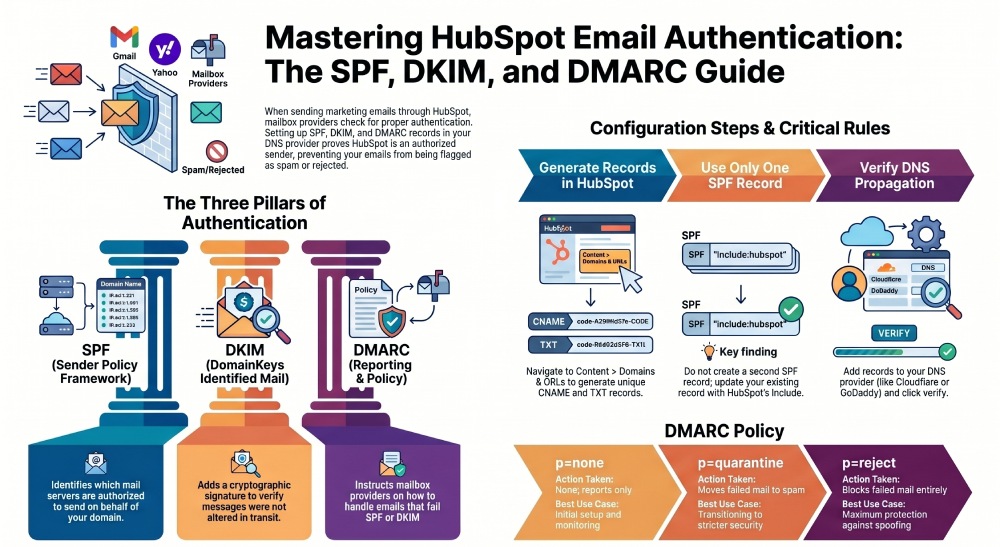
When you send marketing emails through HubSpot, mailbox providers such as Gmail, Yahoo Mail, and M365 check whether your messages are properly authenticated. This is where email authentication becomes essential. HubSpot relies on authentication methods such as SPF, DKIM, and DMARC to prove that your email sending domain is authorized to send messages through the HubSpot marketing platform.
Without correct DNS records, your marketing emails may appear suspicious, even if your content is legitimate. Poor or missing email authentication can damage your sender reputation, reduce your email reputation, and cause messages to land in spam. In some cases, Gmail or Yahoo Mail may reject emails entirely if SPF, DKIM, or DMARC alignment fails.
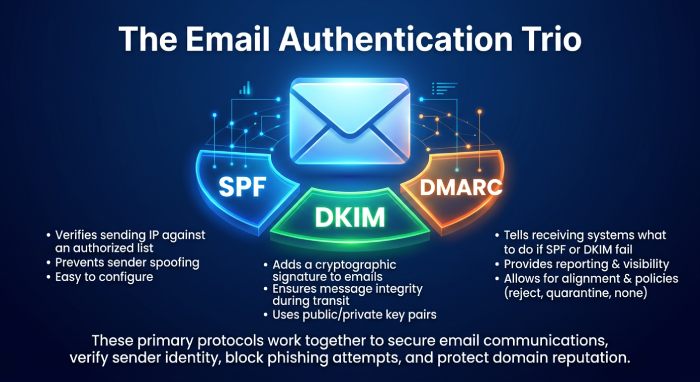
SPF helps identify which mail servers are allowed to send on behalf of your domain. DKIM adds a cryptographic signature to your emails, allowing receiving servers to verify that the message was not altered. DMARC tells mailbox providers what to do when SPF or DKIM fails and can also report failed authentication attempts. Together, these authentication methods protect against email spoofing and improve deliverability.
For HubSpot users, domain authentication is especially important because marketing emails are sent from HubSpot infrastructure, often using HubSpot-managed systems such as hubspotemail.net. Whether you use a dedicated IP address or shared IP addresses, your DNS records must correctly identify HubSpot as an approved sender.
Prerequisites: Accessing HubSpot Email Settings and Your DNS Provider
Before adding HubSpot DMARC, SPF, and DKIM records, make sure you have the correct access in both HubSpot and your DNS provider. You need a HubSpot user account with proper user permissions to connect an email sending domain. In many portals, access controls may restrict who can update domain connection settings, so confirm that your account can manage domain authentication.
In HubSpot, click the settings icon, then go to Content > Domains & URLs. You may also see this area labeled as Domains & URLs, depending on your HubSpot interface. From there, open the Email Sending tab to start the domain connection process for your email sending domain.
You will also need access to your DNS provider, such as Cloudflare, GoDaddy, Namecheap, or your hosting provider. This is where you manage DNS settings for your root domain or subdomain. For example, if your business sends from mydomain.com, your DNS records may be added at the root domain level. If you send from a subdomain such as newsletter.yourcomany.com, the DNS records must be added for that specific subdomain.
Before making changes, confirm:
- Your From email address, such as no-reply@domain.com
- Whether you are authenticating the root domain or a subdomain
- Whether your DNS provider supports CNAME records and TXT record entries
- Whether you are using a dedicated IP or shared IP address in HubSpot
- Whether two-factor authentication (2FA) is enabled on your user account for security
If your company has strict access controls or a password protected DNS management workflow, coordinate with your IT team. For complex accounts, HubSpot Support or your HubSpot account manager can help review setup instructions. The HubSpot Community is also useful for troubleshooting provider-specific issues, including Cloudflare proxy settings or M365-related sender information questions.
Configuration Steps for HubSpot SPF, DKIM, and DMARC
How to Add and Verify HubSpot SPF and DKIM Records Correctly
To add SPF and DKIM in HubSpot, begin in Content > Domains & URLs, then open the Email Sending tab. Choose to connect an email sending domain and follow HubSpot’s setup instructions. HubSpot will generate the required DNS records for your domain verification.
For most accounts, HubSpot provides CNAME records for DKIM. These CNAME records point your domain to HubSpot-managed authentication hosts. DKIM is typically the most important email authentication method for HubSpot because it signs your marketing emails and helps mailbox providers confirm that HubSpot is authorized to send for your email sending domain.
HubSpot may also provide SPF guidance. In many cases, SPF is configured through a TXT record using an include mechanism that authorizes HubSpot. A typical SPF record may reference HubSpot infrastructure, though you should always copy the exact SPF record value from your HubSpot portal rather than guessing.
HubSpot SPF and DKIM Values You’ll See
HubSpot usually displays a host/name field and a value/target field for each DKIM record. In your DNS provider, you add these as CNAME records. Avoid manually editing the value unless your DNS provider requires a specific formatting adjustment.
SPF Record Notes
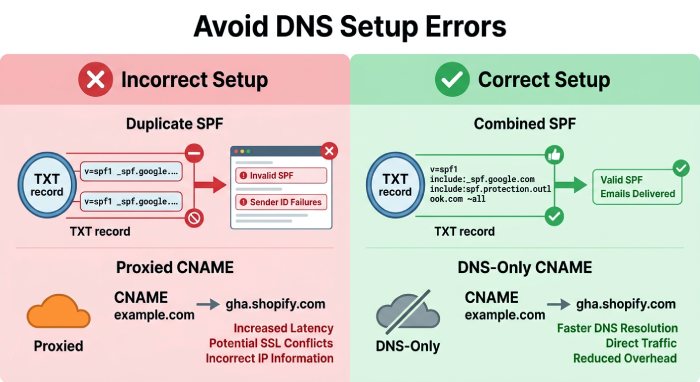
An SPF record is published as a TXT record in the Domain Name System (DNS). If your domain already has an SPF record for M365, Google Workspace, or another platform, do not create a second SPF record. Instead, update the existing SPF record with the HubSpot include mechanism. Multiple SPF records can cause SPF failure and hurt deliverability.
For example, if mydomain.com already authorizes M365, your SPF record may need to include both M365 and HubSpot. The exact syntax depends on your existing email policies, so validate carefully before saving.
DKIM CNAME Records Notes
DKIM for HubSpot usually requires two CNAME records. These CNAME records allow HubSpot to sign marketing emails using your authenticated email sending domain. In Cloudflare, make sure DKIM CNAME records are set to DNS-only, not proxied. A proxied DKIM record can break email authentication because receiving servers need to resolve the CNAME records directly.
After adding the SPF record and DKIM record values, return to HubSpot and click verify. HubSpot will check the authentication status of your DNS records. DNS propagation can take minutes or several hours, depending on your DNS provider.
How to Set Up a DMARC Record for HubSpot Emails
A DMARC record is also added as a TXT record in your DNS provider. DMARC builds on SPF and DKIM by defining how receiving mail servers should handle failed email authentication. It is an authentication protocol that also provides reporting, helping you monitor email spoofing and unauthorized use of your domain.
A basic DMARC record for a domain might look like this:
Name: _dmarc.mydomain.com
Type: TXT
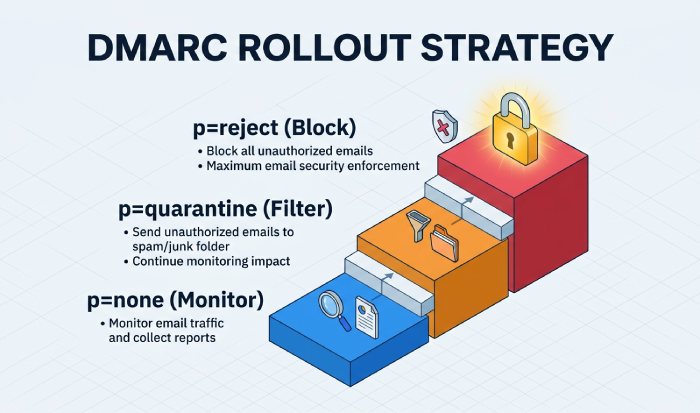
Value: v=DMARC1; p=none; rua=mailto:dmarc-reports@mydomain.comThe p=none setting is a neutral policy. It allows you to collect reports without telling mailbox providers to reject or quarantine mail. This is useful when transitioning domains, cleaning up subscribers, or checking whether all legitimate senders are properly aligned.
Once you understand your authentication results, you can move from a neutral policy to stricter email policies, such as:
- p=quarantine: suspicious emails may be placed in spam or quarantine
- p=reject: failed messages may be rejected outright
For HubSpot marketing emails, DMARC alignment usually depends on DKIM alignment with your email sending domain. That is why correct DKIM CNAME records are critical. If DKIM passes and aligns, DMARC can pass even if SPF alignment is not ideal due to HubSpot’s sending architecture.
DMARC is especially important for brands sending from addresses such as no-reply@domain.com, because attackers often imitate no-reply address formats. A properly configured DMARC record helps receiving providers verify sender information and protect subscribers from phishing.
Common HubSpot DMARC, SPF, and DKIM Mistakes and How to Fix Them
One common mistake is adding duplicate SPF records, which is why many organizations use AutoSPF to manage SPF configurations across multiple email platforms. A domain should have only one SPF TXT record. If you use M365, HubSpot, and another marketing platform, combine authorized services into one SPF record using the correct include mechanism.
Another common issue is adding DKIM CNAME records incorrectly. Some DNS providers automatically append the root domain, which can turn a valid host into a duplicated name, such as selector._domainkey.mydomain.com.mydomain.com. If HubSpot shows DKIM as unverified, compare the exact host and value fields in your DNS provider.
Cloudflare users should also confirm that HubSpot CNAME records are not proxied. DKIM CNAME records must be DNS-only. If they are orange-cloud proxied, DKIM authentication may fail, and deliverability can suffer.
DMARC mistakes usually involve enforcing quarantine or reject too quickly. Best practices recommend starting with a neutral policy, reviewing reports, then moving gradually to quarantine or reject. This phased announcement approach is useful when transitioning domains, launching a new subdomain, or moving from shared IP addresses to a dedicated IP.
A poor sending strategy can also harm email deliverability even when SPF, DKIM, and DMARC are technically correct. If you are using a new email sending domain, warm up domain activity gradually. Avoid sending large campaigns to old contact lists without cleaning up subscribers first. Monitor subscriber feedback, spam complaints, bounces, and engagement signals.
If messages still fail authentication, check the HubSpot authentication status in the Email Sending tab. Compare each DKIM record, SPF record, and DMARC record against your DNS records. For unusual cases, such as a domain named Timbrowntown or a complex multi-brand setup, contact HubSpot Support, consult your HubSpot account manager, or search the HubSpot Community for provider-specific examples.
Finally, remember that email authentication is not a one-time task. Review DNS records whenever you change your email sending domain, add a dedicated IP, switch DNS provider, update your From email address, or add a new subscriber allowlist process. Correct HubSpot SPF, DKIM, DMARC, and CNAME records create the technical foundation for strong deliverability and safer marketing emails.
General Manager
Founder and General Manager of DuoCircle. Product strategy and commercial lead for AutoSPF's 2,000+ customer base.
LinkedIn Profile →