Inside RFC 6376: How DKIM Verification Actually Works

Quick Answer
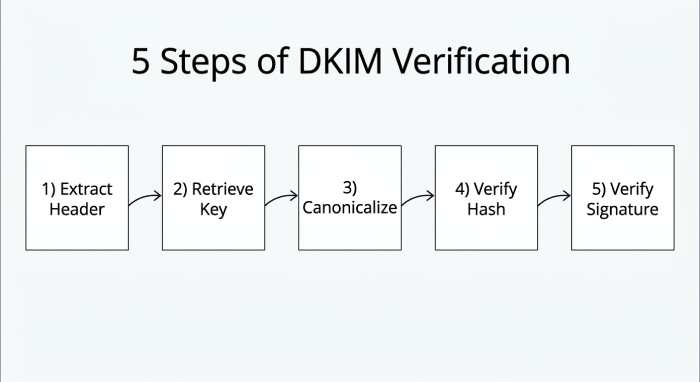
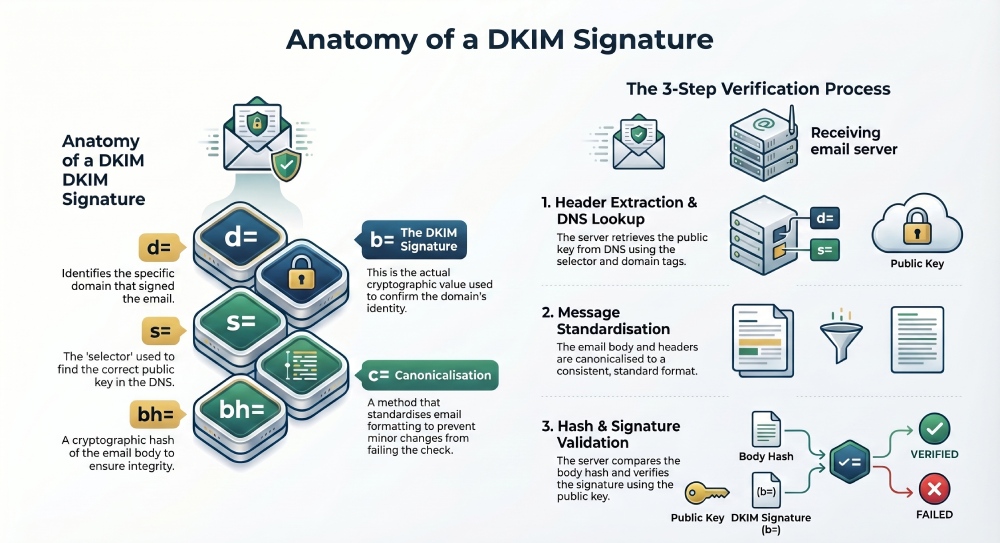
DKIM verification under RFC 6376 follows five steps: the receiving server extracts the DKIM-Signature header, looks up the public key in DNS using the selector and signing domain, canonicalizes the message, recomputes and compares the body hash, and finally verifies the cryptographic signature with the public key. If any step fails, the DKIM check fails.
DKIM verification under RFC 6376 follows five steps: the receiving server extracts the DKIM-Signature header, retrieves the public key from DNS using the s= selector and d= signing domain, canonicalizes the message according to the c= tag, recomputes and compares the body hash in bh=, and verifies the signature in b= against the public key. If any step fails, the DKIM check fails and the receiver decides whether to accept, quarantine, or reject the message.
Learn more in our comprehensive DKIM guide.
Every email that your recipients receive comes with an invisible claim that “this email is from who it says it comes from and is sent as it is without any alterations or tampering.”
For the longest time, there was no protocol or measure to substantiate this claim; perhaps that’s why cybercriminals exploited this gap to send out phishing and spoofing emails. It was only in 2011 that the Internet Engineering Task Force (IETF) published RFC 6376, standardizing DomainKeys Identified Mail (DKIM) to protect outgoing emails from being spoofed or tampered with along the way to recipients’ inboxes.
DKIM goes beyond relying solely on the “From” address to verify email legitimacy; it uses cryptographic signatures to sign outgoing messages to confirm their authenticity. When the receiving server receives the email, it checks the DKIM signature and verifies it using the public key stored in your DNS records. If the DKIM signature can be successfully verified using the public key, the email is considered authentic and safe to deliver. If it cannot, the DKIM check fails, and the email may be marked as suspicious, sent to spam, or rejected altogether.
This is what happens on the outside; what goes on behind the scenes is more technical and governed by RFC 6376. Let’s dig deeper and understand how DKIM verification actually works.
What is a DKIM signature, and what information does it contain?
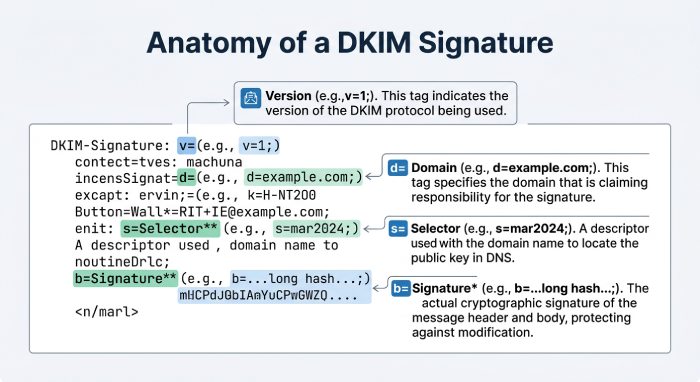
A DKIM signature is not a typical signature that you add at the end of your messages; it is a special header attached to the outgoing email by the sending server. This header contains everything a receiving server needs to verify the message: the signing domain, the algorithm used, the headers that were signed, a hash of the message body, and the cryptographic signature itself.
A typical DKIM signature looks like this:
DKIM-Signature: v=1; a=rsa-sha256; d=example.com; s=big-email;
 c=relaxed/relaxed; q=dns/txt; t=1614350000;
 h=from:to:subject;
 bh=uMixy0BsCqhbru4fqPZQdeZY5Pq865sNAnOAxNgUS0s=;
 b=LiIvJeRyqMo0gngiCygwpiKphJjYezb5kXBKCNj8DqRVcCk7obK6OUg4o+EufEbB
  tRYQfQhgIkx5m70IqA6dP+DBZUcsJyS9C+vm2xRK7qyHi2hUFpYS5pkeiNVoQk/Wk4w
  ZG4tu/g+OA49mS7VX+64FXr79MPwOMRRmJ3lNwJU=
Each syntax and semantic element of the DKIM signature is defined by RFC 6376 to ensure that it works uniformly across various mail agents and verification systems.
Some major tags you should know about:
v=tells the DKIM version being useda=specifies which signing algorithm was used, such as rsa-sha256d=identifies the domain that signed the emails=specifies the selector used to locate the correct public key in DNSc=defines the canonicalization method for headers and bodyh=lists the email headers that were included in the signaturebh=contains the hash of the email bodyb=contains the actual DKIM signature value
When these fields come together, they give the receiving server the complete picture of the outgoing email: how it was signed, which domain signed it, and where to find the public key needed for verification.
What goes on behind the scenes of DKIM verification?
DKIM verification does not happen by simply matching the public and private key; it is a standardized verification process, defined by RFC 6376. Following this framework ensures that every receiving server validates DKIM signatures in a consistent and secure way.
Here’s what happens step by step:
How does a receiving server extract the DKIM-Signature header?
When the receiving server receives an email, the first thing it does is look for the DKIM signature header in the incoming mail. This header contains all the information needed to verify the email, such as the signing domain, selector, canonicalization method, signed headers, body hash, and the DKIM signature itself.
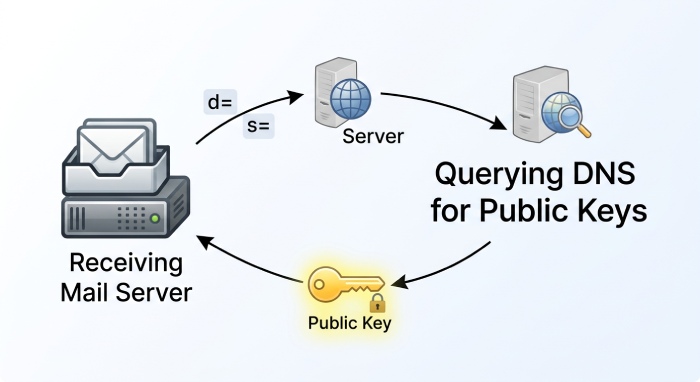
How is the public key retrieved from DNS?
Once the server has these details, the next step is to retrieve the public key linked to the sender’s domain. It does this by querying DNS using the selector (s=) and signing domain (d=) mentioned in the DKIM-Signature header.
For example, if the DKIM signature contains s=selector and d=example.com, the receiving server looks up:
selector._domainkey.example.comThe retrieved public key must align with the declared signing domain in the DKIM signature to confirm that the message is indeed coming from where it claims to be.
How does canonicalization normalize the message?
Before the receiving server can verify the DKIM signature, it first has to standardize the email. This process is called canonicalization. Depending on the method specified in the c= tag, the server processes the email headers and body in a consistent format. This helps prevent minor changes, such as extra spaces, line breaks, or different capitalization, from causing the DKIM check to fail.
How is the body hash verified?
After the message has been canonicalized, the receiving server computes the hash of the email body and compares it with the value stored in the bh= tag of the DKIM signature. If both match, the email was not changed after signing and is considered safe.
How is the DKIM signature itself verified?
If the body hash matches, the next step is to verify the DKIM signature. The receiver uses the public key stored in DNS to verify the signature stored in the b= tag. If the two values align, it confirms that the email was signed by the claimed domain and that the signed parts of the message were not altered after signing.
Why DKIM alone is not enough
Now that you know what goes on behind DKIM verification, it might be easier to understand why implementing DKIM is not as easy as it seems. With all the technical complexities and moving parts, even a small mistake can compromise your email deliverability and leave your domain exposed to spoofing and phishing attempts.
DKIM verifies message integrity, but it does not tell receivers which IPs are allowed to send on your behalf - that is the job of SPF. And neither DKIM nor SPF, on its own, tells receivers what to do when authentication fails - that is the job of DMARC. Full protection requires all three layers, correctly aligned.
This is why it is recommended that you rely on a trusted email authentication expert. AutoSPF enhances email security by automatically managing SPF records - the layer DKIM cannot cover - helping prevent spoofing and improving email authentication reliability.
If you want to start your email authentication journey, reach out to us to get started.
Topics
CTO
CTO of DuoCircle. Architect of AutoSPF's SPF flattening engine and DNS monitoring infrastructure.
LinkedIn Profile →