IRIS CRM Login and SPF Setup: A Step-by-Step Guide

Quick Answer
Learn how to access your IRIS CRM account and configure SPF records correctly. This step-by-step guide covers IRIS CRM login, SPF setup, DNS configuration, and email authentication best practices to improve email deliverability and security.
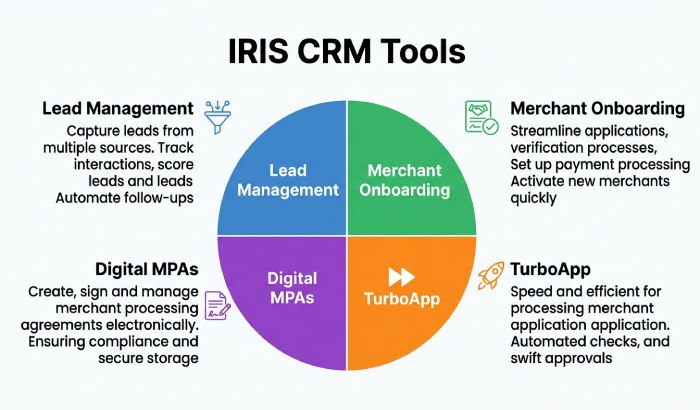
IRIS CRM is a customer relationship management platform designed for the payments industry, supporting merchant services teams with lead management, merchant onboarding, payment processing workflows, and ongoing merchant support. If your organisation uses IRIS CRM to send business email from its domain, configuring SPF correctly is an important step in authenticating those messages and supporting reliable email delivery.
Why secure access is business-critical
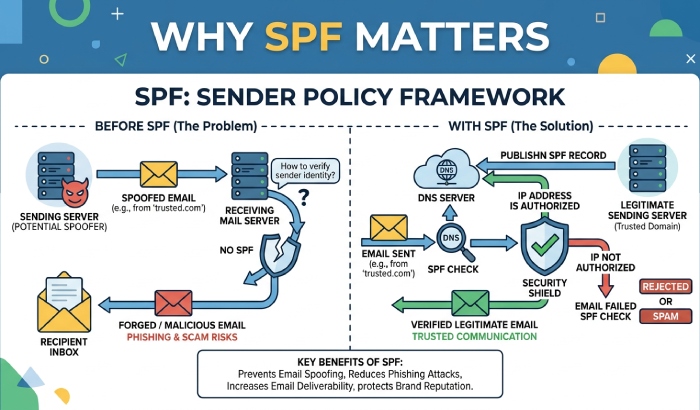
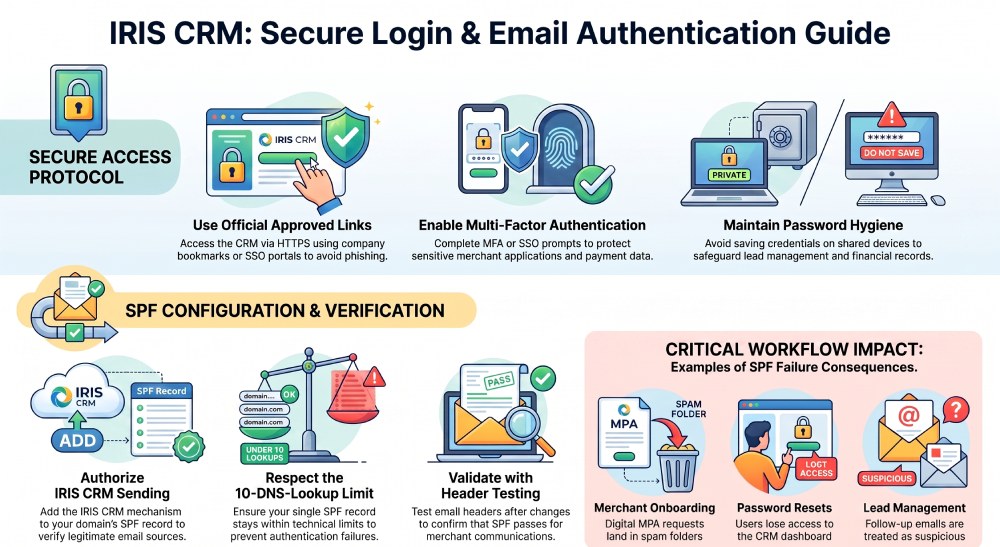
A secure and properly configured email authentication setup is important when using IRIS CRM for business communications. SPF helps receiving mail servers verify that email sent on behalf of your domain comes from authorised sending sources. Correct SPF configuration can support reliable email delivery and reduce the risk of legitimate IRIS CRM messages being treated as suspicious or spoofed.
If IRIS CRM is authorised to send email using your domain, its sending infrastructure should be included in your domain’s SPF record alongside your other legitimate email providers. Keeping the SPF record accurate and within the DNS lookup limit helps prevent SPF failures that could affect message delivery.
Where SPF setup fits into IRIS CRM access
Although SPF setup is not part of the visible IRIS CRM login screen, it matters for email communications. If your team sends password reset messages, merchant onboarding updates, lead generation emails, or merchant support notifications through IRIS CRM, your domain should have proper SPF records. SPF helps receiving mail servers verify that IRIS CRM or authorized third-party providers can send email on your behalf.
This is especially important for automated collection, automated categorization, automated data capture, status updates, support tickets, and merchant application follow-ups. Without proper SPF, users may miss password reset links, merchants may not receive digital MPA requests, and underwriting or processor onboarding messages could land in spam.
How to Find the Correct IRIS CRM Login URL
Log in to your IRIS CRM account using the login URL provided by your organisation or IRIS CRM administrator before proceeding with the email configuration.
Use official company-approved links
The safest way to find the correct login URL is to use an approved bookmark, internal documentation, or a link shared by your administrator. Avoid searching randomly for IRIS CRM login and entering your username and password into unfamiliar pages. A secure login should use HTTPS, display the correct domain, and match the URL your company provided.
Some companies place the IRIS CRM login link inside internal portals, onboarding documentation, email templates, or a Helpdesk article. Others may provide access through a single sign-on portal using SSO, Microsoft, Google, or another identity provider. If SSO is enabled, your sign-on flow may redirect you from IRIS CRM to your identity provider and then back to the IRIS CRM dashboard. AutoSPF helps businesses simplify SPF record management and improve email authentication.
Log In Before Configuring SPF
Log in to your IRIS CRM account using the login URL provided by your organisation or administrator. Once you have access, you can proceed with the email authentication and SPF configuration for the domain used to send messages through IRIS CRM.
Step-by-Step IRIS CRM Login Instructions for Users
The IRIS CRM login process is straightforward when you have the correct URL, username, password, and permission level.
1. Open the approved IRIS CRM login page
Start by opening the official IRIS CRM login URL in a modern browser. Confirm that the page uses HTTPS and that the domain is correct. If your organization uses Cloudflare or another security layer, you may briefly see a browser verification page before the IRIS CRM login form appears.
2. Enter your username and password
Type your username exactly as assigned. In many environments, the username is your work email address. Then enter your password. If your company uses SSO, select the single sign-on option instead of entering a local IRIS CRM password. The SSO sign-on process may route through Google, Microsoft, or another identity provider.
Avoid saving your password on shared computers. IRIS CRM may contain customer data, lead generation records, lead management notes, merchant application files, gateway services information, and payment processing details. Good password hygiene protects the dashboard and the data behind it.
3. Complete any authentication requirements
Depending on your security settings, IRIS CRM may require additional user authentication. This could include SSO verification, multi-factor authentication, or an identity provider prompt. Administrators may also restrict login access based on role, IP address, or account status.
4. Review your dashboard after sign-on
After successful sign-on, you should reach the IRIS CRM dashboard. The dashboard may display productivity tools, lead management tasks, lead generation activity, merchant onboarding progress, processor onboarding queues, underwriting items, reporting widgets, and business intelligence views.
Many users rely on the dashboard to access TurboApp, submit a merchant application, prepare a digital MPA, use digital forms, request e-signature through Adobe Sign or Agreement Express, and review payment processing or gateway services records. Sales teams may also see calling tasks, SMS Messaging, Internal Chat, calendar syncing, Google Calendar, Outlook Calendar, and Scheduling Tool reminders.
5. Verify Your IRIS CRM SPF Configuration
After adding the required IRIS CRM SPF mechanism to your domain’s existing SPF record, verify that the record is published correctly. Check that there is only one SPF record for the domain, that the IRIS CRM mechanism appears in the record, and that the record does not exceed the SPF 10-DNS-lookup limit.
You can use an SPF lookup tool to confirm that the record is syntactically valid and that the expected sending sources are authorised. If your SPF record contains several third-party services, review its DNS lookup count carefully to avoid SPF failures.
Key Takeaways
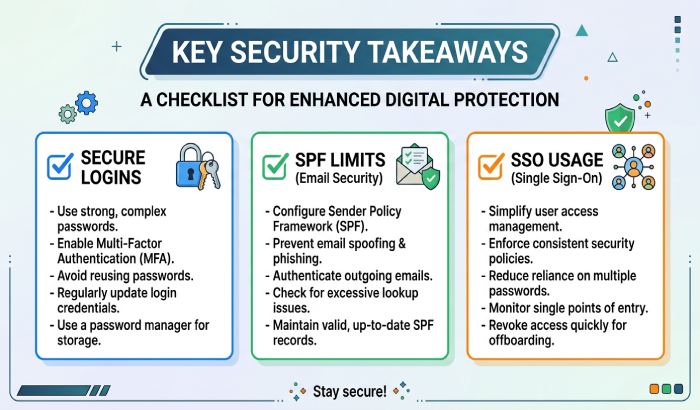
- Secure IRIS CRM login practices require strong passwords, unique usernames, role-based access, and SSO where possible.
- SPF helps authenticate IRIS CRM email and improves deliverability for merchant onboarding, lead generation, and digital MPA workflows.
- Update only one SPF record per domain and include all approved email-sending platforms.
- Test email headers after SPF changes to confirm authentication passes.
- Regularly review dashboard access, CRM permissions, and communication workflows to protect customer data and operational continuity.
General Manager
General Manager of DuoCircle. Product strategy and commercial lead for AutoSPF's 2,000+ customer base.
LinkedIn Profile →