Inside RFC 6376: How DKIM Verification Actually Works
A technical walkthrough of how receiving servers verify DKIM signatures under RFC 6376 — from header extraction to canonicalization, body hash, and signature check.
Streamline your SPF record management, enable DMARC compliance, and improve your email deliverability by fixing the SPF 10-lookup limitation.
30-day free trial · No credit card required · Setup in 60 seconds


Wait, did we just say…
Or, you get ONE full year of access to AutoSPF for free… on us!
60 seconds is all it takes. Login, add your domain name, Click… and you're Done!
If it takes any longer we will give you one full year of access to AutoSPF for free. How's that for a challenge?
Designed for the Enterprise. Accessible to All.
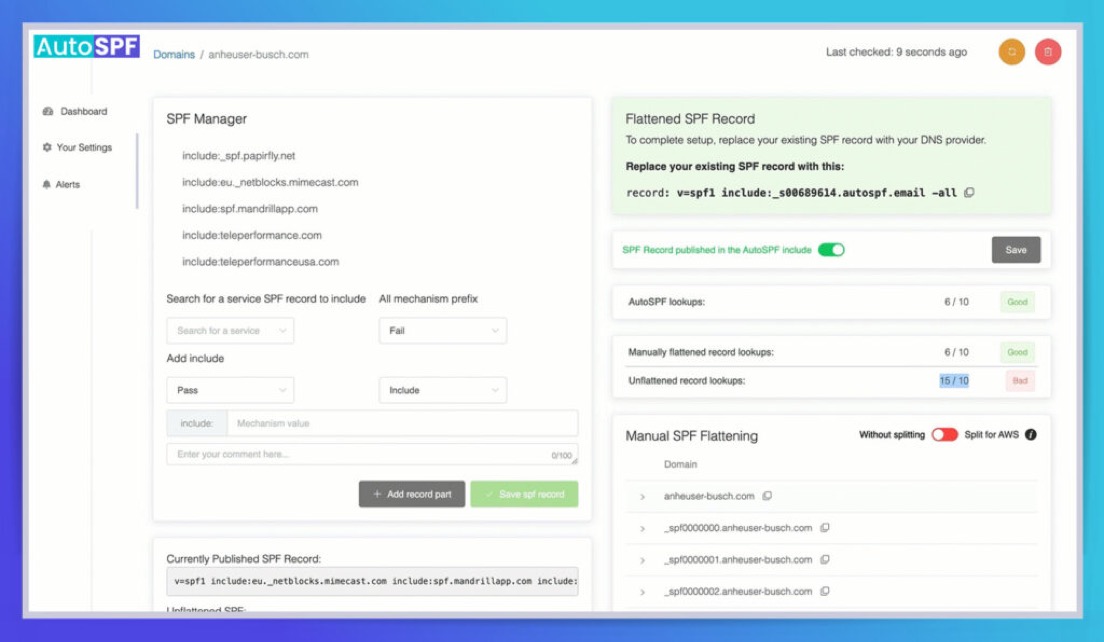
Solve the 10-Record SPF Limit — "Too Many DNS Lookups"
Fix your broken SPF Record in 60 seconds flat
Unlimited emails on all plans — no monthly cap, no meter
The leading solution for over 2,000+ businesses who rely on AutoSPF daily
Better Email Deliverability
…like you belong there.
AutoSPF automatically flattens and compresses all domains within the SPF, eliminating the need for additional DNS lookups.
More DNS lookups = More problems. Improve your email deliverability and reach the right people when it matters most.

Near Zero Configuration
Solve Your SPF Challenges in Less than 60 Seconds.
We do all the hard work. We can help you set it up, or you can do it on your own.
Our unique process replaces a single DNS entry with an automatically managed SPF record, and DNS availability is ensured by Cloudflare.
Our Guarantee:
We will fix your broken SPF record within 60 seconds or less, or your first 12 months are on us.
Email Inbox Improved

Fast Forward Setup
Align SPF for DMARC. Resolve your authentication and alignment problems. Immediately solve one of the biggest hurdles to switching to an effective REJECT or QUARANTINE policy.

Zero Setup Worries
No need to clean up your legacy records before automatically flattening them. Import them, and then use our tools to easily identify and modify your records. Top-level or subdomains supported.

True Macros
One of the only providers to use macros for SPF management allowing for an unlimited number of includes. Unlike competitive systems that chain includes and have their own inherent 10 lookup limits.
No Hidden Costs. No Surprises.
No matter how big or small your business is, our pricing is transparent. No email sending limits, no artificial cutoffs, and no user-based pricing. Full support for teams, customers, and multiple domains.
View PricingImprove Your Email Deliverability
No Extra Suite of Tools Needed
AutoSPF focuses strictly on SPF flattening for the enterprise and business space. This isn't a line item to us.
We spend all our energy and resources focused on the best technology solutions for your SPF management.
Easy Setup. Zero Maintenance.
Set it up once without the need for regular logins. We automate regular checks for vendor changes or updates every 15 minutes. It happens in the background — automatically and transparently.
It's simply copy, paste, replace… and you're done! No need for regular logins.
We currently support hundreds of Enterprise clients. With a SOC-2 Type II compliance certification, and almost 10 years in business, you are assured of a solution that meets expected industry standards.
Get more of your emails in the right place at the right time with our premium features, tailor-made for small and medium sized businesses.
Starting at just $37/month
Learn More for SMBsGive us a test drive for 30 days at no cost. Fix your broken SPF in less than 60 seconds!
Fix My SPF Record!SPF flattening resolves all nested include mechanisms in your SPF record into a flat list of IP addresses. This reduces DNS lookups from 10+ to just 2-3, keeping you within the RFC 7208 limit of 10 DNS lookups per SPF evaluation. AutoSPF automates this process and rescans every 15 minutes.
RFC 7208 limits SPF evaluation to 10 DNS lookups per query. Each include, a, mx, and redirect mechanism counts as one lookup. Most businesses using 5+ email services (Google Workspace, Salesforce, Mailchimp, etc.) exceed this limit, causing SPF to return a permerror and emails to fail authentication.
AutoSPF replaces your complex SPF record with a single managed include that points to our infrastructure. We continuously resolve all your sending services into optimized IP lists, served through Cloudflare DNS with 99.99% uptime. Setup takes 60 seconds: copy, paste, replace one DNS record.
60 seconds or less. Add your domain, copy the generated SPF record, paste it into your DNS provider, and you are done. If setup takes longer than 60 seconds, your first year is free — that is our guarantee.
Yes. AutoSPF is one of the only SPF management providers offering macro-based SPF. Macros allow truly unlimited includes with just 1-2 DNS lookups, plus IP obfuscation so competitors cannot see your authorized senders. Available on Premium ($97/mo) and Enterprise ($387/mo) plans.
No — AutoSPF is a dedicated SPF management tool with enterprise-grade SLAs specifically for serving your SPF record. For DMARC reporting, we offer DMARC Report (dmarcreport.com), a separate purpose-built product. This separation ensures our SPF uptime SLA is never compromised by reporting workloads.
AutoSPF did exactly as described, it helped us get past our 10 lookup limit. Afterwards, we hit another limit regarding overall capacity and when contacted, they quickly provided us with a new solution to eliminate capacity issues entirely going forward, so now we can add as many SPF records as needed. They also provided us with a personalized support video explaining their new method in its entirety using our instance as the example.
Verified User
Financial Services · Mid-Market (51-1000 emp.)
AutoSPF was easy to initially set up on our own and a great cost effective entry into spf flattening. Needed our first support assistance today and got great response including a video demonstrating the issue I was trying to solve, a quick fix, and more detailed followup.
Greg F.
Mid-Market (51-1000 emp.)
AutoSPF is a simple tool to solve a significant problem. It does it so very well without any issues. Additionally, the support is very professional and goes above and beyond to help resolve any email-related issues for their customers.
Verified User
Insurance · Mid-Market (51-1000 emp.)
A technical walkthrough of how receiving servers verify DKIM signatures under RFC 6376 — from header extraction to canonicalization, body hash, and signature check.
A layered monitoring program for SPF problems in Office 365 — EOP/Defender alerts, DMARC analytics, header parsing, SPF DNS validation, Sentinel correlation, and synthetic tests.
Diagnose SPF fail errors from Received-SPF headers and bounce messages, fix the root cause — wrong IPs, missing includes, duplicate records, or the 10-lookup limit — and keep deliverability steady.
SPF PermError means your domain's SPF policy is permanently unrecoverable. Learn how to diagnose root causes — from the 10 DNS lookup limit to NXDOMAIN includes, circular references, and TXT segmentation — with dig, spfquery, and DMARC correlation.
RFC 7208 is the official IETF standard that defines how SPF works — from record syntax and mechanisms to DNS lookup limits and result qualifiers. This guide explains what domain owners need to know about the framework powering email authentication.
Learn how to set up SPF records for Google Workspace — from the baseline include:_spf.google.com record to mapping third-party senders, managing DNS permissions, and avoiding the 10-lookup limit.